Back to StarTrinity SMS/VoIP Softswitch
Destination sets are lists of country codes (prefixes) and prices that are used by your suppliers to bill you (for outgoing traffic) (rates of your suppliers/vendors).
You have 3 routes with 3 different rates for the same termination and you want the calls to go to route1 rate1 first; if it fails you want it to try route2 rate2; if it fails you want it to go route3 rate3.
The configuration of routing group is following: the 3 routes mean 3 different terminators going to same IP address but having different tech. prefixes. Each terminator would have its own destination set (pricelist, prefixes with prices). In the routing group you link the 3 terminators and 3 destination sets, and routing would be done according to policy of the routing group ("routing group item order" = try one terminator after another as they are listed in group).
The CSV upload procedure works in this way:
Example: Find out numbers that called more than 10 times and connected 0, 1 or 2 times (ASR less than 20%) with low ACD (less than 30 seconds). B number in CDR contains tech. prefix, last 11 digits are used.
There are more undocumented methods available, you can see them in Fiddler when using the web interface. Please let us know if you need some new API method
180327 - retail VoIP origination, PIN code IVR, SIP phones setup
180327 - routing, billing, load balancing setup. tracing call via CDR, recording audio for troubleshooting
180328 - tech. prefixes (CLD number manipulation), calls between originator SIP phones
180331 - register Yealink SIP softphone as originator
180511 - configure StarTrinity softswitch with skyline GSM gateway with IVR filter against SIM blocking
180825 - About VoIP Software Quality Assurance (QA), StarTrinity Softswitch, SIP Tester. SIP load testing (stress testing), audio quality tests. How we develop VoIP software and test it. How we test audio quality. What we don't like in marketing. What we don't like in Linux and C++
190105 - Promotion of CDR analyser module to reduce SIM blocking/barring
190108 - StarTrinity Softswitch for GSM termination, FAS, generated traffic
190109 - StarTrinity Softswitch for GSM termination, FAS, generated traffic. part 2
190111 - StarTrinity Softswitch for Dialer Campaigns, custom CallXML. part 3
GSM Termination - GoIP SIM management in StarTrinity softswitch
StarTrinity VoIP and SMS Softswitch Tutorial
- Quick start: step by step tutorials
- Database architecture diagram
- Database entities and system concepts
- Web interface
- Default call processing steps
- Web API
- Software architecture (modules)
- Change log
- Blog
- Video tutorials/presentations
- CallXML scripts for the softswitch
Quick start: step by step tutorials
Set up the VoIP/SMS softswitch on your own Windows server
- Install Google Chrome or Edge browsers (if it is not already installed). It works better than Internet Explorer for the softswitch WebUI
- Install StarTrinity Softswitch from this link (online installer)
- Download EXE file to the server, open it, run web installer
- Make sure that default SIP port (5060) and HTTP port (19019) are not busy by some other application on the server
- This will install Windows Service "StarTrinity Softswitch" with free demo license and open web interface (web UI) on default http port 19019
- Optionally you can use settings from another installation of the softswitch (if you set up a redundant server with same configuration):
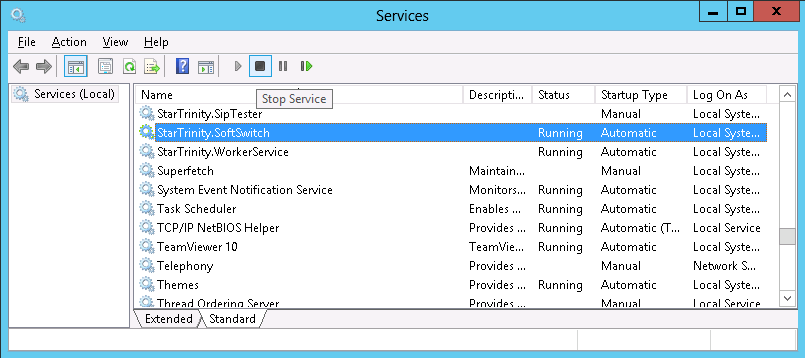
- Go to Control Panel - System and Security - Administrative tools - Services
- Stop service "StarTrinity Softswitch"
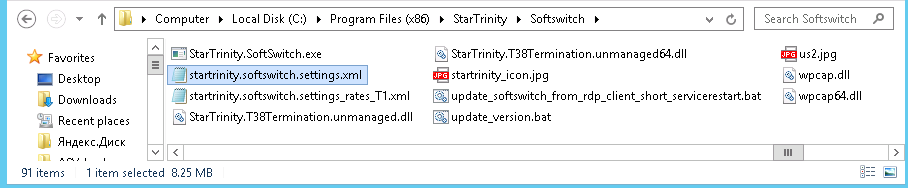
- Replace XML files ("StarTrinity.Softswitch.settings.xml" and "StarTrinity.Softswitch.settings_rates*.xml") with from another installation of the softswitch. Default folder with softswitch program files is C:\Program Files (x86)\StarTrinity\Softswitch
- Start service "StarTrinity Softswitch"
- Access web UI and check the restored configuration settings
- If you set up softswitch with clean new settings file, enter administrator's password in web UI. Please don't use simple passwords
- The softswitch is ready to for further configuration (VoIP and SMS)
- Optionally you can set up HTTPS certificate for better security (default HTTPS port is 19020)
- If you have anti-virus software installed with its own embedded firewall, configure it to allow access for the softswitch
Set up VoIP dialer campaigns
- Install softswitch on your Windows server or register on our server. Free trial is available.
- Open softswitch web UI in browser, log in
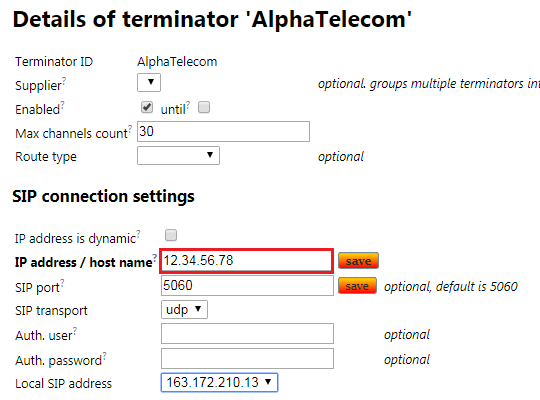
- Go to menu - Configuration - Terminators - add terminator (VoIP provider). Enter unique ID for the new terminator, number of channels allowed by the destination server (capacity)

, enter IP address or host name of destination server, where you need to send VoIP calls.
- Configure A and B numbers for generated VoIP traffic
- If you have lists of numbers: go to menu - Configuration - Number lists - add number lists with A (CLI) and B (CLD) numbers. Upload CSV or TXT files with numbers, 1 number per line.
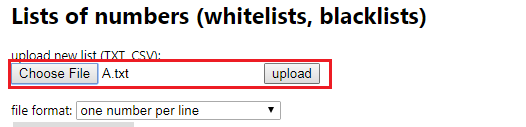
After uploading click "details..." to check the uploaded numbers
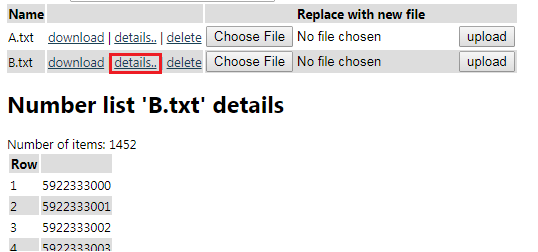
- If you want to generate numbers randomly: enter CLI and CLD pattern further, when configuring dialer campaign
- If you have lists of numbers: go to menu - Configuration - Number lists - add number lists with A (CLI) and B (CLD) numbers. Upload CSV or TXT files with numbers, 1 number per line.
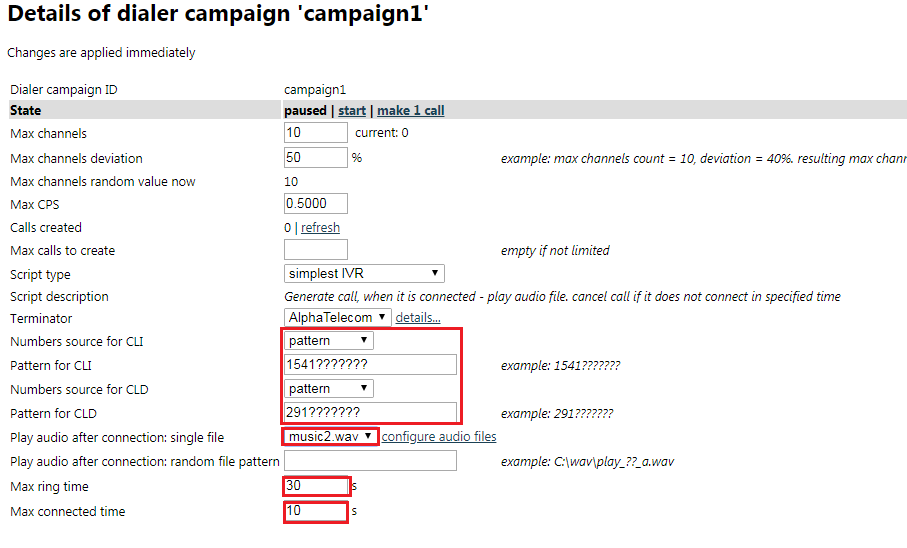
- Go to menu - Configuration - Dialer campaigns - add dialer campaign. Select type of script, terminator, enter max channels count and max calls per second for the new dialer campaign.
Generated traffic is always limited either by "max channels count" limit or by "max calls per second" limit.

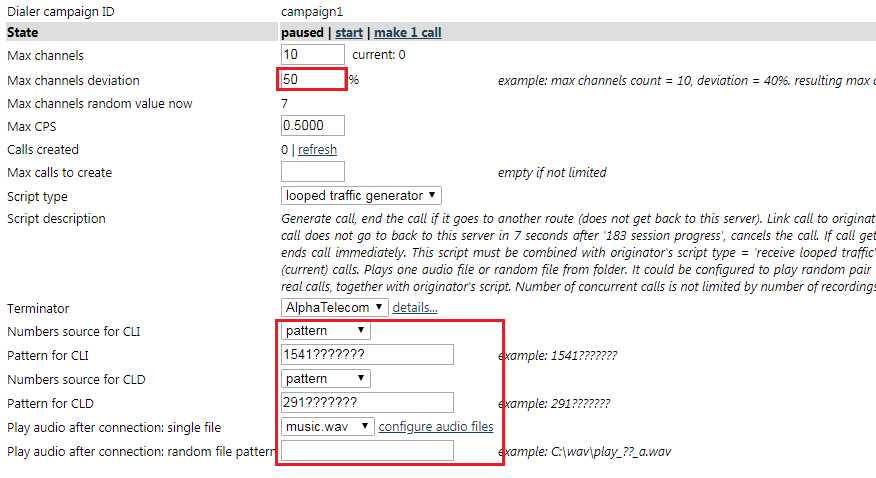
Click "Add", system redirects you to more detailed configuration screen. Here you configure source of A and B numbers, max. channels deviation (for randomly fluctuating number of channels).- For "Simplest IVR" script: enter max. connected time (billed duration), max ringing time, audio file for playback
- For "Looped generated traffic" script: configure audio file:
Configure receiving generated traffic back to this server:- Go to menu - Configuration - Originators - add originator. Enter unique ID, max channels allowed to receive from originator (source server).

- Configure authentication: enter source IP address, set script type = "looped traffic receiver", set ASR, configure audio file playback:
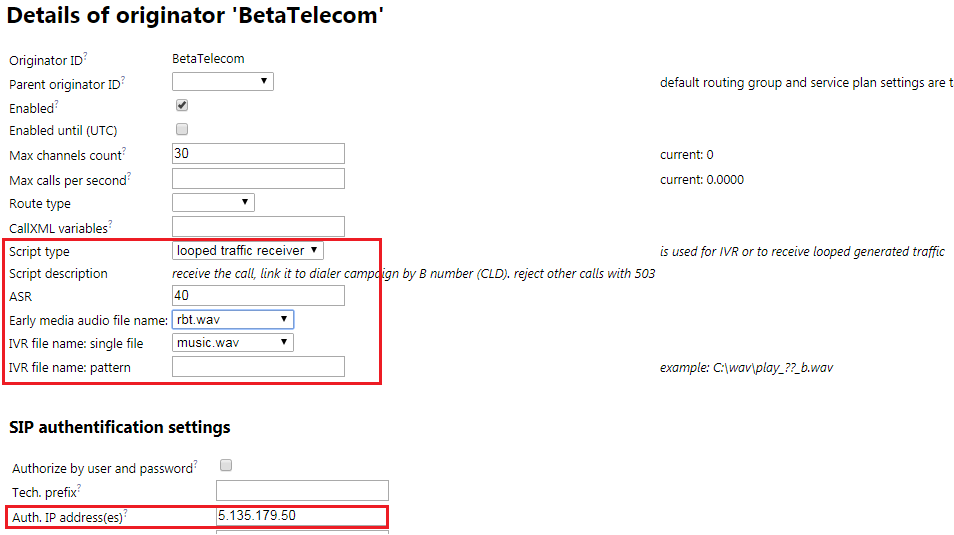
- Go to menu - Configuration - Originators - add originator. Enter unique ID, max channels allowed to receive from originator (source server).
- For "Simplest IVR" script: enter max. connected time (billed duration), max ringing time, audio file for playback
- Optionally make a single test call (menu - configuration - dialer campaigns - dialer campaign details - state - make 1 call)
- Start dialer campaign (menu - configuration - dialer campaigns - dialer campaign details - state - start)
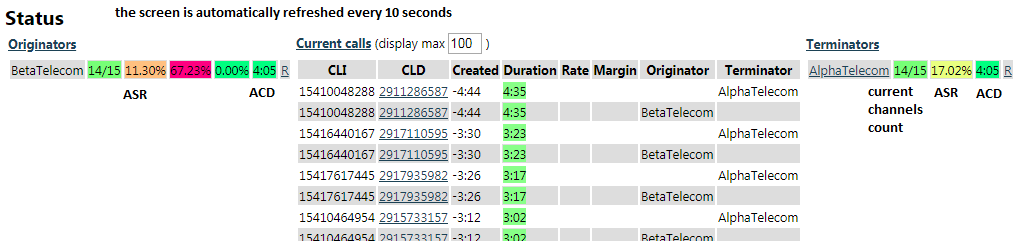
- Monitor current calls:
- menu - Status - Status:
- menu - Status - Current Calls:
- menu - Status - Status:
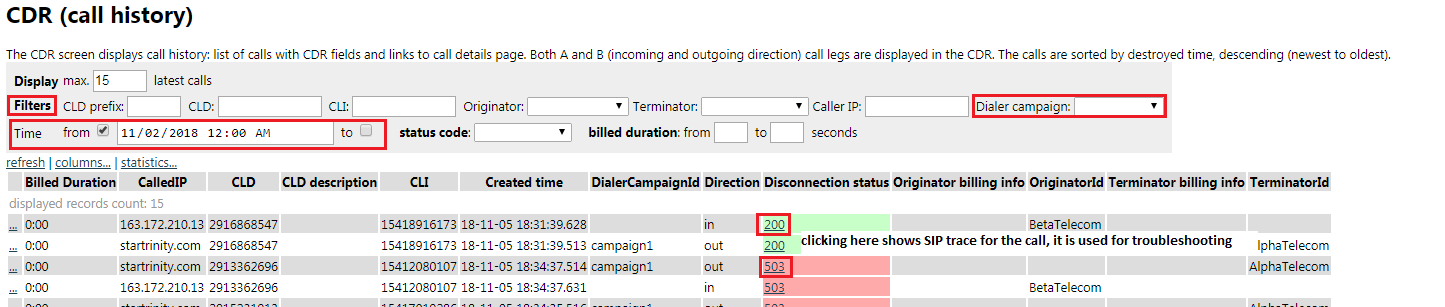
- Check call history (CDR), see details of connected and/or failed calls
- If calls failed: find call in CDR, click on "status code", see details in SIP trace
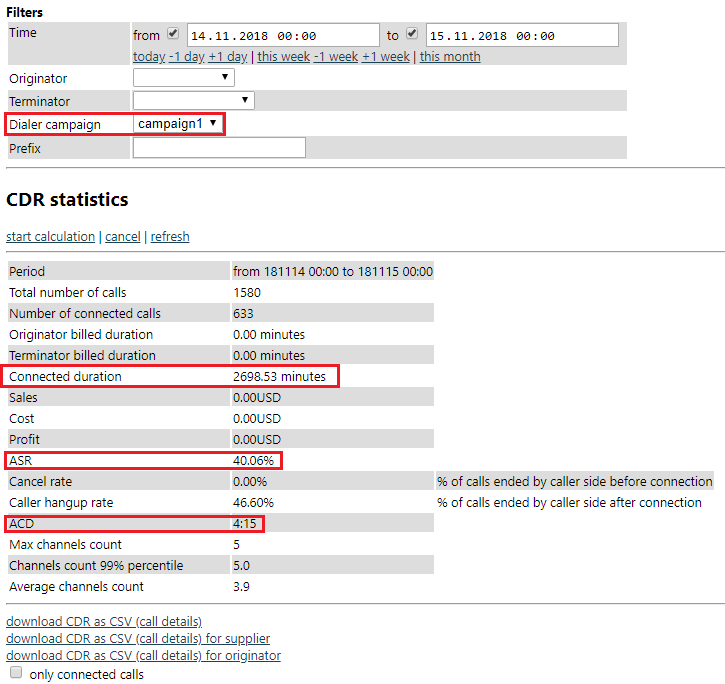
- Check CDR statistics: total connected time for a period of time and specific dialer campaign
- In order to make a pause in generated VoIP traffic, go to menu - configuration - dialer campaigns - dialer campaign details - state - click "pause"

Setting up the softswitch for the first call - basic steps
- Setup termination side
-
Terminators -> Add new terminator. Enter SIP termination-side connection parameters.
- If termination-side has does not have public IP (for example, gateway is connected via starlink), check "IP address is dynamic" and enter the softswitch IP, user and password into your GSM gateway. Set short registration interval (60) seconds to avoid loosing trafic when your gateway goes offline - in this case the softswitch will send 503 immediately to origination side
- Destination sets -> Add new destination set (tariff for supplier, list of available country codes with prices, routes)
-> Add new route into the new destination set or import routes from supplier's pricelist file - Routing groups -> Add new routing group -> Add new item that links the routing group with previously created terminator and destination set
-
Terminators -> Add new terminator. Enter SIP termination-side connection parameters.
- Setup origination (customer) side
- Tariffs -> Add new tariff (list of country codes and prices to charge clients) ->Add new rate into the new tariff
- Service plans -> Add new service plan (service options like billing cycle), select previously created tariff
- Originators -> Add new originator (company or user which sends VoIP traffic to you), select service plan and routing group. Enter SIP connection parameters
- Make the first test call from the originator
- CDRs -> look at the call history, see if the new call is there. Check status field
- If there is a problem, go to CDRs -> "..." (details) -> SIP trace. Also check system log
Set up connection to GoIP GSM gateway in single server mode
- Install the softswitch on hosted windows server or in office on a windows PC, configure network router for SIP and RTP traffic
- Create terminator in the softswitch:

- Configure GoIP gateway:
- Configurations - Basic VoIP:

- Set up limits of using SIM cards, configure human behaviour simulation to avoid SIM blocking
- Configurations - Basic VoIP:
- Check status of terminator in the softswitch, it must be "registered"
- Make a test call directly from softswitch "terminator details" web page, check details in CDR
- Create originators (clients), service plans, tariffs, destination sets, routing groups, tariffs
- Create a test originator for softphone, make test call via softphone. See details in CDR and in CDR - call details - routing/billing log
Set up SMS campaign (SMS generator)
- Install the softswitch with SMS features enabled, or set setting "EnableSMPP" = "1" and restart the softswitch
- Connect StarTrinity softswitch as client to your another SMS server:
- Add account for StarTrinity at other server where you will receive generated SMSes: enter new systemID, password, StarTrinity server IP address, allow this IP in firewall
- Go to web interface → Menu → SMS → MCs
- Enter MC ID: unique identifier like "myserver1"
- Enter your another SMPP server IP, SMPP port, system ID, password
- Click "Add": add new connection/bind to another SMPP server
- When successfully connected, it should display status = "Bound"
- If you need to send SMSes to numbers from a list, upload the number lists
- Prepare a CSV file with numbers: 1 number per line
- Go to menu → Configuration → Number lists
- Upload the file
- Check the uploaded list by clicking "details..."
- Note that uploaded file name will be used later in configuration
- Create SMS campaign
- Go to web interface → Menu → SMS → SMS campaigns
- Enter unique ID like "smsGen1"
- Click "Add new SMS campaign" (SMS generator)
- Enter number of transmitted SMSes per second (MPS), schedule parameters, other parameters:

- if you need to transmit 1 sms per second, set "Max MPS" = "1"
- Make a test: SMS campaign details → "send 1 SMS"
- View SMS history: Menu → SMS → SMS CDR
- For troubleshooting, if SMS is not sent: check for CallXML script and SMPP connectivity errors in system logs
- Check errors: Menu → Status → System log: errors
- Set global seting "LogLevel" = "3" in Menu → Configuration → System settings
- Go to Menu → Status/CDR → System log: files
- Start SMS campaign
Database architecture diagram
The database architecture diagram is the best way to show you concepts and features of our softswitch. There diagram contains alternative names of entities, because there are multiple names for basic concepts in the VoIP industryInvoices(payments, money movements)
- originator ID
- payment date
- amount, currency
- status
- service, payment details
Originators / Customers(Accounts / Calling cards / Clients / Companies)
- ID
- routing group ID
- service plan ID
- enabled
- balance, max. balance
- max. credit
- web auth. info, last web auth. date
- webAPI auth. info, last webAPI auth. date
- VoIP auth. info
(IP address(es), user+password) - tech. prefix, CLD auth. mask (DID)
- codec configuration
- disconnection reason mapping
- max. channels count
- prefix to add/remove,
CLI/CLD translation rule - recording mode
- RTP proxy mode
Service plans
- ID
- tariff ID
- billing cycle: week, month, none
- invoice template ID
- billing day: [of week/month], on assignment
- low balance alarm threshold
- low balance alarm mode: email, sound during call
- additional service charges
Tariffs / Destination sets(Pricelists)
- ID
- enabled
- applied to: originator, terminator
- currency
- grace period / free seconds
- connection fee
- min billed duration
- max loss % (for originators)
Tariff rates / Routes
- tariff ID
- enabled
- prefix
- min, max digits
- country, region (automatically detected)
- rate1, period1, rateN, periodN
- activation, expiration date
- priority in routing group (for originators)
Routing groups
- ID
- routing policies (ordered list):
- prefix length
- least coast
- weighted distribution (load balancing)
- routing group item order
- route priority
- combination of
ASR, ACD, PDD
Routing group items
- ID
- routing group ID
- destination set ID
- terminator ID
- weight
- order in routing group
- activation, expiration date
Suppliers(Vendors / Companies)
- ID
- company information
- web auth. info
- balance
- base currency
- time zone
Terminators / Gateways
- ID
- supplier ID
- enabled
- host / IP address, SIP port
- IP address is dynamic (behind NAT)
- VoIP auth. parameters
- max. channels count
- max. call duration
- prefix to add/remove,
CLI/CLD translation rule - CLD, CLI regular expression
- custom CLI
- 100, 18x, 200 response timeouts
- codec configuration
- media proxy mode: auto, always, never
- SIP headers proxy mode
- packet capture mode:
none, SIP, SIP+RTP - hunt stop SIP codes
- quality monitoring
- ACD, ASR, PDD thresholds (optional)
- statistics window
- bad quality action:
make last in route, disable - notify on status change
- retry interval
- retry batch
- status / error message
Calls / CDRs
- SIP Call-ID
- originator ID
- terminator ID
- CLI (caller ID)
- CLD (called number)
- created, answered, destroyed time
- VoIP quality fields
- billed duration
- status / error message
- many other fields
Tickets
- ID
- created date
- status
- SIP Call-ID
- originator ID (who reported)
Custom tables from your database
according to custom CallXML script
Tenants / Softswitch owners / Hosted customers
- ID / email
- payment processor API settings: PayPal, skrill
- web administrator password
- max. channels count
- custom CallXML script
- white label logo settings
System settings
- name
- value
System log messages
- severity level
- date
- message
Runtime operations and commands, dynamically calculated fields
Originators / Customers(Accounts / Calling cards/ Clients / Companies)
- generate invoice
- complete invoice (add funds)
- make test call
- check without call: check routing configuration, get rates, limits, CLI/CLD translations
- traffic statistics
- number of child accounts / customers / calling cards
- export / import accounts
- analyse impact of network delays on billing
Service plans
- traffic statistics
Tariffs(Destination sets / Pricelists)
- export / import rates
- number of routes
- traffic statistics
Routing groups
- automatically generate tariff for originator
Routing group items
- traffic statistics
Suppliers(Vendors / Companies)
- traffic statistics
Terminators / Gateways
- traffic statistics
- analyse impact of network delays on billing
Calls / CDRs
- terminate current call
- export / import CDRs
- query CDRs by syntax expression. e.g. bad / failed calls: SIP error code, dead air audio, one way audio, high jitter, high packet loss, low MOS, small billed duration
Traffic statistics applied to any subset of calls from CDR
- grouping by originator, terminator, prefix / route, etc
- ASR, ACD, PDD
- number of current calls: ringing, connected, total
- real capacity chart for terminator based on concurrent calls count and error responses
- sales / cost / profit
- billed duration
- history charts
- minimum, maximum, average
- moving averages: based on time, based on N recent calls
Database entities and system concepts
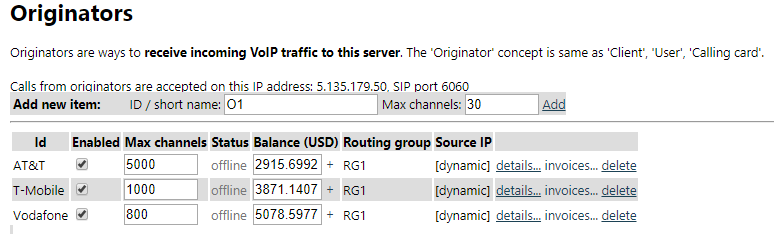
Originators
Originators are ways to receive incoming VoIP traffic to this server. The 'Originator' concept is same as 'Client', 'User', 'Calling card'.| Field | Description | Example |
|---|---|---|
| Id | Unique identifier. Can't be modified after creation | |
| Customer's email | ||
| Customer name | First name and last name or name of organization | |
| Address | Customer's address | |
| Enabled | Is used to temporarily disable incoming traffic from originator | |
| Parent originator ID | Is used to store default settings for child originators: routing group and service plan | |
| Max channels count | Limits number of concurrent calls (channels) from client through this originator account | |
| Max calls per second | Limits number of calls per second (CPS) from client | |
| CallXML variables | List of custom CallXML variables for custom CallXML scripts | var1=x;var2=y |
| CallXML script |
Customizes call processing script for the originator. Please see CallXML script examples.
Predefined CallXML script types (call flow scenarios)
| |
| Authentification settings | ||
| Authorize by user and password | Selects authentication mode: user/password (digest authentication) or IP authentication | |
| Tech. prefix | Is used for IP authentication mode. Technical prefix - a required prefix in CLD which is used to authenticate the call. The tech. prefix is removed after authentication, it should not exist in tariff rates list | |
| Auth. IP address(es) | Is used for IP authentication mode (client's signaling IP). Semicolon-delimited list of allowed originator's IP addresses. Client's media IP address is not restricted | |
| Auth. user name | User name for digest authenticaton mode. If set, overrides CLI. Is also used as CLD for free calls between originators (configured in service plan settings) | |
| Auth. password | Password for digest authenticaton mode | |
| Registration status | Indicates registration status of SIP phone: online/offline, its IP address | |
| RTP audio settings | ||
| Forced codec | If set, specifies only one declared codec in SDP answer. You can see details about codec negotiation in CDR - call details - SIP trace | |
| Desired codec | If set, specifies preferred codec (top codec in list of supported codecs). The setting is used when you want to select specific codec, if possible, and if you still want to support all other codecs | |
| Don't proxy RTP media | RTP relay mode, is used for open RTP routes. If set, RTP media goes directly from originator to terminator, without passing the softswitch. You might need it to improve audio quality - reduce roud-trip time (RTT, audio latency) and to reduce CPU lo0ad and bandwidth on the softswitch. Drawback of this setting is that originator and terminator can see their RTP IP address and connect to each other without you (as wholesaler). When terminator is your own gateway or server, you can use this setting safely. When you need to convert codecs on the softswitch (transcode), process RTP, measure audio signal or record sound to WAV files, you can not use this setting | |
| Missed call route | Increases selling capacity for missed call (CC) VoIP routes. Rejects call leg B after first ring or immediately after answer. Fake ringback tone can be played to call leg A to extend alerting time | |
| Record RX streams | Turns on recording of received audio streams to WAV files. The recording could be downloaded from CDR - call details | |
| Record TX streams | Turns on recording of transmitted audio streams to WAV files. The recording could be downloaded from CDR - call details | |
| Record mixed streams | Turns on recording of mixed (received + transmitted) audio streams to WAV files. The recording could be downloaded from CDR - call details | |
| Language | Identifies folder for IVR files | |
| DID forwarding settings in DID forwarding mode the call is accepted from DID provider, actual destination number and PIN code are entered via IVR (optionally) | ||
| Auth. CLD | DID number, is used to authenticate and accept calls from DID. Can be set for this originator or for parent originator | |
| Auth. PIN code | PIN code, is used to authenticate call from DID | |
| Auth. CLI's | CallerID's for authentication. One item or semicolon-delimited list. Is used in combination with 'Auth. CLD' for PINless dialing | 18001234;79123456 |
| Unconditional DID forwarding setting in unconditional DID forwarding mode the call is accepted from DID provider and immediately forwarded to predefined number (usually long-distance number) | ||
| Incoming CLD | DID number, is used to authenticate and accept calls from DID | |
| Forward to this number | Number that will go to termination side | |
| Web authentification settings settings for self-care web portal for the client. At the portal the client can view connection settings, CDR (call history), rates, CDR statistics. He can also pay to your PayPal account using PayPal or credit card | ||
| Link for originator | HTTP URL to be used by the client | |
| Web login | ||
| Web password | ||
| Routing | ||
| Routing group | Specifies how the call is routed to terminators. Default value is taken from parent originator. See routing groups | |
| 1. Prefixes to remove | Semicolon-delimited list of prefixes that have to be removed from original CLD | +;00 |
| 2. Min digits (inclusive) | Minimal number of digits in CLD at this step | |
| 3. Prefix to add | Prefix to be added to CLD at this step | |
| Status code mapping | Specifies translation of SIP status codes from termination side to origination side, in this format: [oldCode1]-[newCode1];[oldCode2]-[newCode2]... The setting is needed when your clients complain about specific SIP status codes received from the softswitch and if you want to send different response codes instead | 603-503;404-503 |
| Custom CLI | Specifies a custom CLI, overwrites original CLI | |
| 2xx (connection) timeout | Call alerting timeout, is used to release hang calls in alerting state. Starts with creation of a call (first INVITE) | |
| Billing | ||
| Service plan | Specifies VoIP service plan for the client. Service plan includes tariff and IVR settings. Default value is taken from parent originator. See service plans | |
| Balance (USD) | Current balance on client's account. Is updated in real time with live traffic. Positive balance means prepaid billing. Negative balance means postpaid billing, it becomes debt from client to you. Current calls are instantly disconnected when balance goes below 'minus Max credit' | |
| Max credit (USD) | Maximal allowed debt for the client. Max credit = 0 means prepaid billing. Max credit = 50 means that balance can go down below zero to -50 (postpaid billing and maximum debt = 50) | |
Invoices
Invoices of originator represent his history of payments, both completed and incomplete| Field | Description |
|---|---|
| Created | Date and time when the invoice was created |
| Paid | Date and time when the invoice was paid |
| Amount (USD) | |
| Service description | Short description of the VoIP service for the client. May include number of minutes, destinations. CDR file with details could be downloaded at 'CDR statistics' web page |
| Payment description | Information about payment (e.g. transaction ID) for your own future reference |
| Balance (USD) | Balance of originator (client's account) after the payment |
Service plans
Service plans specify VoIP service contracts and IVR settings for originators| Field | Description |
|---|---|
| Id | Unique identifier. Can't be modified after creation |
| Tariff Id | Specifies which tariff is used for the service plan |
| Enable free calls between originators | Enables calls between VoIP origination clients (SIP softphone users), the calls are not charged. Destination user is found by mathing called number (CLD) to auth. user name |
| Enable balance IVR | When set, the softswitch plays originator's current balance to caller before actual call |
| Enable out of balance IVR | When set, the softswitch plays a warning to originator when he is dialing and out of balance. Otherwise the incoming call is rejected with erroneous SIP status code |
| Enable remaining time IVR | When set, the softswitch plays remaining time before actual call - how much time the caller is able to talk using his current balance |
| Enable busy IVR | When set, the softswitch plays audio message when destination number is busy, so it is clear to client why call has failed |
Tariffs / Destination sets
Tariffs are lists of country codes (prefixes) and prices that are used by you to bill clients (for incoming traffic) (rates for your customers).Destination sets are lists of country codes (prefixes) and prices that are used by your suppliers to bill you (for outgoing traffic) (rates of your suppliers/vendors).
| Field | Description |
|---|---|
| Id | Unique identifier. Can't be modified after creation |
Tariff rates / Routes
The tariff rate or route is selected based on called number (CLD) without tech. prefix. The softswitch finds rate with longest matching prefix, as long as possible. Example: if you have rates 234 = 0.035, 2347 = 0.04, 23472 = 0.05, then number 23411111111 will be billed as 0.035/minute, 23471111111 = 0.04/minute, 23472111111 = 0.05/minute.| Field | Description | Example |
|---|---|---|
| Prefix | Prefix in called number (CLD), country code with operator code. The prefix can't be edited after creation of the record | |
| Description | Description of the prefix, e.g. country, operator, city | Cameroon MTN |
| Enable | Is used to disable traffic to specific prefixes (e.g. premium numbers or blacklisted numbers) | |
| Priority | Is used to elevate priority of the route in the destination set against other destination sets, to select specific terminator for specific prefix. See routing group - routing policy "rate priority + least cost" | |
| Max channels | Is used to limit number of concurrent calls going via the softswitch using this particular rate in destination set | |
| Rate | Rate to bill the calls, in USD/minute. This rate is effective between 'effective from' and 'effective to' dates. Actual current rate depends on current date and time | |
| Period1 | Minimal billed duration (first/initial billed period), in seconds | |
| PeriodN | Duration of consecutive (N-th) billed period, in seconds | |
| Example 1: Period1 = 60 seconds, PeriodN = 60 seconds: call with duration = 90.5 seconds is billed as 120 seconds Example 2: Period1 = 60 seconds, PeriodN = 60 seconds: call with duration = 2.9 minutes is billed as 3 minutes Example 3: Period1 = 1 seconds, PeriodN = 1 seconds: call with duration = 90.5 seconds is billed as 91 seconds Example 4: Period1 = 60 seconds, PeriodN = 1 seconds: caller is initially billed for 60 seconds, after that it goes as per-second billing | ||
| Effective from | Inclusive starting date to use the 'Rate' field. Before the starting date 'Previous Rate' is used for billing | |
| Effective to | Exclusive ending date to use the 'Rate' field. Since the ending date 'Next Rate' is used for billing | |
| Previous rate | Rate to be used before the 'Effective from' date | |
| Next rate | Rate to be used on and after the 'Effective to' date | |
| Min/max digits | Optional filter for CLD number. Inclusive minimal and maximal number of digits in called number | |
Suppliers
Suppliers are companies grouping terminators. The 'Supplier' concept is same as 'Termination partner company', 'Provider', 'Vendor'| Field | Description |
|---|---|
| Id | Unique identifier. Can't be modified after creation |
| Company name | |
| Debt (USD) | Amount of money owed to supplier. Is updated in live mode with live traffic |
| Web UI user name | Authentication info for supplier's self-care web portal where he can check his CDR statistics and call history |
| Web UI password | Authentication info for supplier's self-care web portal where he can check his CDR statistics and call history |
Terminators
Terminators are ways to send outgoing VoIP traffic from this server. The 'Terminator' concept is same as 'Termination point', 'GSM gateway', 'Device', 'Group of SIMs and channels/lines at GSM gateway'. Terminators are grouped in suppliers (companies who own terminators).| Field | Description | Example |
|---|---|---|
| Id | Unique identifier. Can't be modified after creation | |
| Supplier | Optional link to supplier who owns this terminator. Supplier groups multiple terminator that belong to one company | |
| Enabled | Is used to temporarily disable outgoing traffic to originator | |
| Enabled until | Is used to temporarily disable outgoing traffic to originator until specific date/time | |
| Max channels count | Call capacity of the terminator, maximal number of concurrent channels | |
| SIP connection settings | ||
| IP address is dynamic | Is set when termination gateway is behind firewall or does not have a static IP address. In this mode the gateway sends REGISTER to the softswitch using user name and password (see below) | |
| Auth. user | User name for authentication for REGISTER requests from terminator/gateway. If set, overrides CLI | |
| Auth. password | Password for authentication for REGISTER requests from terminator/gateway | |
| IP address / host name | IP address or host name of destination VoIP provider or gateway's static IP | |
| SIP port | SIP port number at destination host. Default is 5060 | |
| Proxy IP address / host name | SIP proxy IP address or host name | |
| Proxy SIP port | SIP port number at SIP proxy. Default is 5060 | |
| RTP audio settings | ||
| Forced codec | If set, specifies only one declared codec in SDP offer. You can see details about codec negotiation in CDR - call details - SIP trace | |
| Desired codec | If set, specifies first codec in list of all supported codecs in SDP offer (top codec in list of supported codecs). The setting is used when you want to select specific codec, if possible, and if you still want to support all other codecs | |
| Don't proxy RTP media | RTP relay mode, is used for open RTP routes. If set, RTP media goes directly from originator to terminator, without passing the softswitch. You might need it to improve audio quality - reduce roud-trip time (RTT, audio latency) and to reduce CPU lo0ad and bandwidth on the softswitch. Drawback of this setting is that originator and terminator can see their RTP IP address and connect to each other without you (as wholesaler). When terminator is your own gateway or server, you can use this setting safely. When you need to convert codecs on the softswitch (transcode), process RTP, measure audio signal or record sound to WAV files, you can not use this setting | |
| Record RX streams | Turns on recording of received audio streams to WAV files. The recording could be downloaded from CDR - call details | |
| Record TX streams | Turns on recording of transmitted audio streams to WAV files. The recording could be downloaded from CDR - call details | |
| Record mixed streams | Turns on recording of mixed (received + transmitted) audio streams to WAV files. The recording could be downloaded from CDR - call details | |
| Custom ringback tones | Semicolon-separated list of file names. Audio files are uploaded in audio files manager | |
| Timeout settings | ||
| 18x (alerting) timeout | Optional timeout to receive 'alerting' response from terminator, in seconds. Is used to release hang calls and try next terminator in routing group | |
| 2xx (connection) timeout | Optional timeout to receive 'connected' response from terminator, in seconds. Is used to release hang calls and try next terminator in routing group | |
| Max connected time | Optional max. duration of calls, in minutes. Is used to automatically release hang connected calls | |
| Routing, number validation / filtering, number manipulation | ||
| 1a. Allowed prefix(es) | Is used to validate dialed number, before adding tech. prefix | 00592;00593;592;593 |
| 1b. Regular expression(s) | Is used to validate dialed number, before adding tech. prefix. | ^592[0-9]{7}$;^593[0-9]{7}$ for numbers like 237672991443 (prefix 237 + 9 digits) it would be ^237[0-9]{9}$ |
| 2. Prefixes to remove | +262;262;00262 | |
| 3. Prefix to add (tech. prefix) | Technical prefix. Is not related to destination set (rate sheet) because rate is calculated before adding the technical prefix | |
| Number validation / filtering for CLD (called ID) and CLI (ANI, caller ID) | ||
| 4.1 CLI regular expression(s) | Is used to validate caller ID | ^1[0-9]{10}$;^563[0-9]{8}$ ^[0-9]+$ (only digits) |
| 4.2 pass CLI only with these numbers of digits | 10;11;12 | |
| 4.3 do not pass CLI from this list | Static CLI (caller ID) prefixes or numbers blacklist. The lists of numbers are uploaded on a special webpage | |
| 4.4 pass CLI only from this list | Static CLI (caller ID) prefixes or numbers whitelist | |
| 4.5 pass CLD only with these numbers of digits | 10;11;12 | |
| 4.6 do not pass CLD from this list | Static CLD (called ID) prefixes or numbers blacklist | |
| 4.7 pass CLD only from this list | Static CLD (called ID) prefixes or numbers whitelist | |
| CLD dynamic blacklists (RAM-based) | ||
| 4.8.1 (stage #1) don't pass CLD if there are more than XX attempt(s) in previous YY minute(s) | ||
| 4.8.2 (stage #2) don't pass CLD if there are more than XX attempt(s) in previous YY minute(s) | ||
| 5. Change CLI to this | A number to overwrite caller ID | |
| Number of times to retry on 503 | Number of times to retry call to the terminator if received SIP status code = 503 (Service Unavailable). Is used to increase ASR when terminator (supplier) oversells his capacity | |
| Enable 3xx redirection | Enables redirection when termination side (redirect server) sends response with status 3xx and new destination IP address | |
| Inner CallXML element name | Specifies name of inner CallXML element name (inside 'transfer' element) when using custom CallXML script | |
| Anti-FAS connection delay (milliseconds) | Specifies delay of connection signal (200 OK) for the anti-FAS call processing logic: when terminator connects the call, this signal is delivered to originator with delay. Should be greater than duration of connected FAS calls. FAS calls usually have short duration: 1-2 seconds. If we make a delay greater than the 1-2 seconds (let's say 2500 milliseconds), the FAS calls will still be in "ringing" state at originator's side, and not connected, so there will be no FAS at orignator's side. | |
| Anti-FAS ringing time periods (milliseconds) | Turns on anti-FAS delay only for calls with certain ringing duration. This helps if FAS happens only with calls having certain alerting duration (before connection). | |
Routing groups
Routing groups are used to link terminators and destination sets and to group them for routing. Example explaining how the routing group works:You have 3 routes with 3 different rates for the same termination and you want the calls to go to route1 rate1 first; if it fails you want it to try route2 rate2; if it fails you want it to go route3 rate3.
The configuration of routing group is following: the 3 routes mean 3 different terminators going to same IP address but having different tech. prefixes. Each terminator would have its own destination set (pricelist, prefixes with prices). In the routing group you link the 3 terminators and 3 destination sets, and routing would be done according to policy of the routing group ("routing group item order" = try one terminator after another as they are listed in group).
| Field | Description |
|---|---|
| Id | Unique identifier. Can't be modified after creation |
| Allow negative margin | When unchecked, the softswitch blocks calls if termination price is higher than origination price (to avoid profit loss in the softswitch, negative margin) |
| Routing policy | Specifies method of routing calls to list of terminators, order of terminators in routing. One of following values:
|
Routing group items
Routing group items are used to link terminators and destination sets| Field | Description |
|---|---|
| Enabled | Is used to temporarily turn off the routing group item without removing it |
| Order | Order of terminator in routing for routing policy "routing group item order" |
| Terminator | Terminator which is linked to the routing group item |
| Destination set | Destination set which is linked to the routing group item |
| Max channels | Optional capacity limit for VoIP traffic going via this particular item in this routing group |
| Weight | Weight of the item in load balancing mode (routing group policy "Weight") |
Audio files
Audio files are used to play IVR messages and custom ringback tones. The files could be downloaded or uploaded via web interface. WAV and MP3 formats are supportedNumber lists
The lists of numbers could be used as white lists or black lists to filter VoIP traffic. A list can contain few million numbersWeb interface
Web pages to configure database entities
The softswitch web interface contains web pages to configure all entities listed above - add new record, view existing records, edit record, delete record. Here is screenshot for originators:
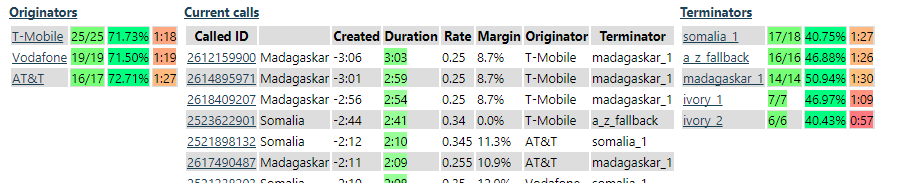
Status
The status screen displays live information about current calls, originators, terminators
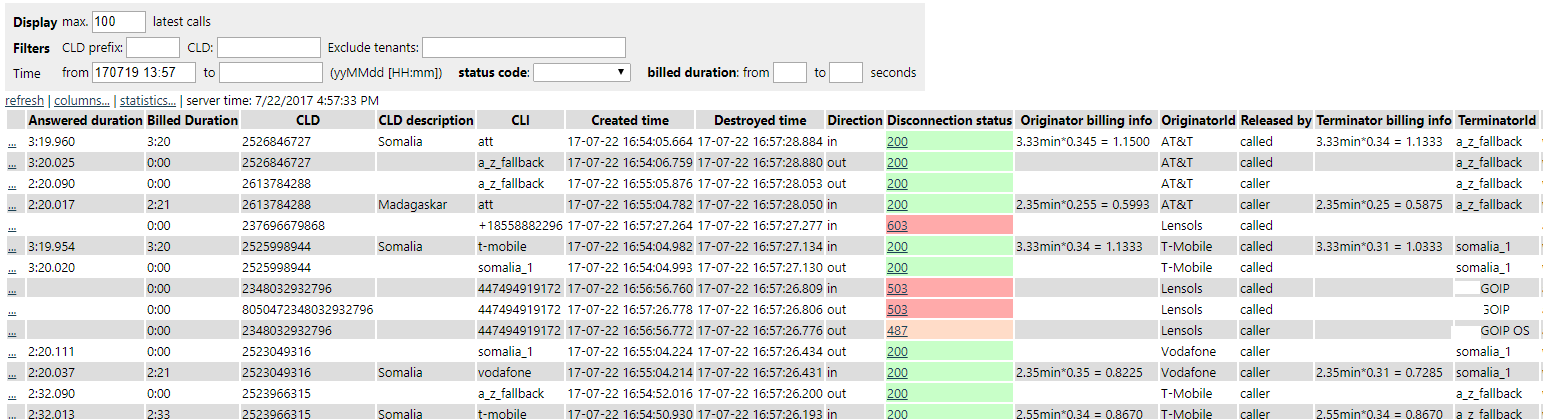
CDR
The CDR screen displays call history: list of calls with CDR fields and links to call details page. Both A and B (incoming and outgoing direction) call legs are displayed in the CDR. The calls are sorted by destroyed time, descending (newest to oldest). There are various filters for the displayed calls. CDR fields are described directly in web interface and in SIP tester tutorial.
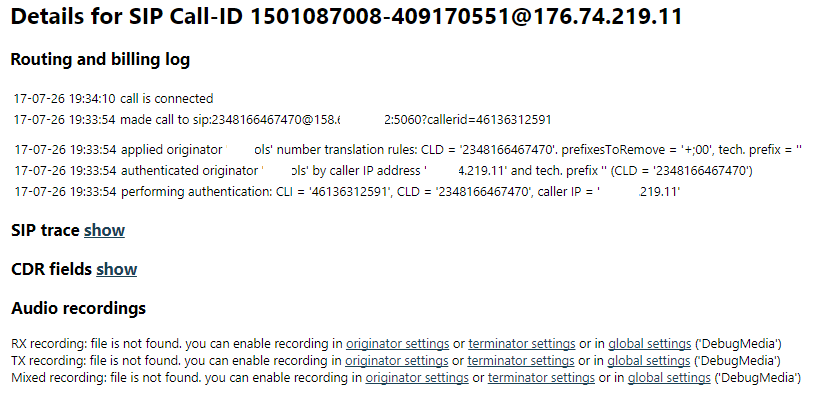
Call details
The call details page is accessible from CDR screen, it contains routing/billing log (used for troubleshooting), SIP trace, CDR fields, links to download WAV recordings (see screenshot below)
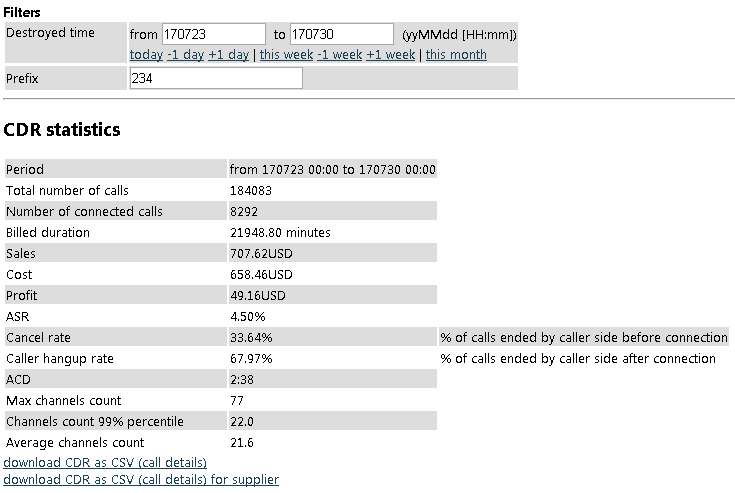
CDR statistics
The web page is used to calculate CDR statistics for a specified period of time: number of minutes billed, total sales, total cost, total profit, ACD, ASR, statistics about actual number of channels
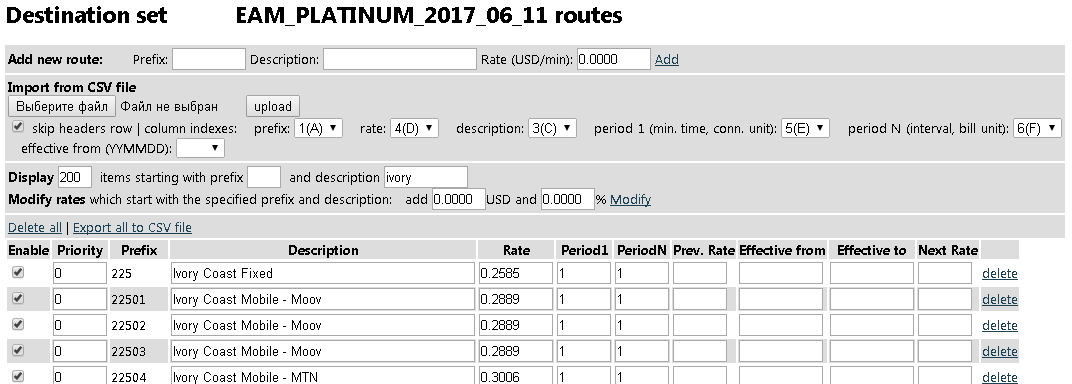
Destination set details
The page is used to manage termination-side rates. You can download rate sheet as CSV, upload from CSV, apply filter to displayed rates, make bulk modifications (add margin).The CSV upload procedure works in this way:
- Upload new CSV file, parse lines, for every line do this:
- If the uploaded prefix does not exist in current list - add it into the list
- If the uploaded prefix already exists in list - overwrite it. If the new uploaded line has non-empty "effective date" field, and the effective date is in future - keep current rate and use field "next rate" for new uploaded rate
- Remove prefixes which do not exist in new uploaded file (in case if the supplier is no longer able to terminate the removed prefixes)
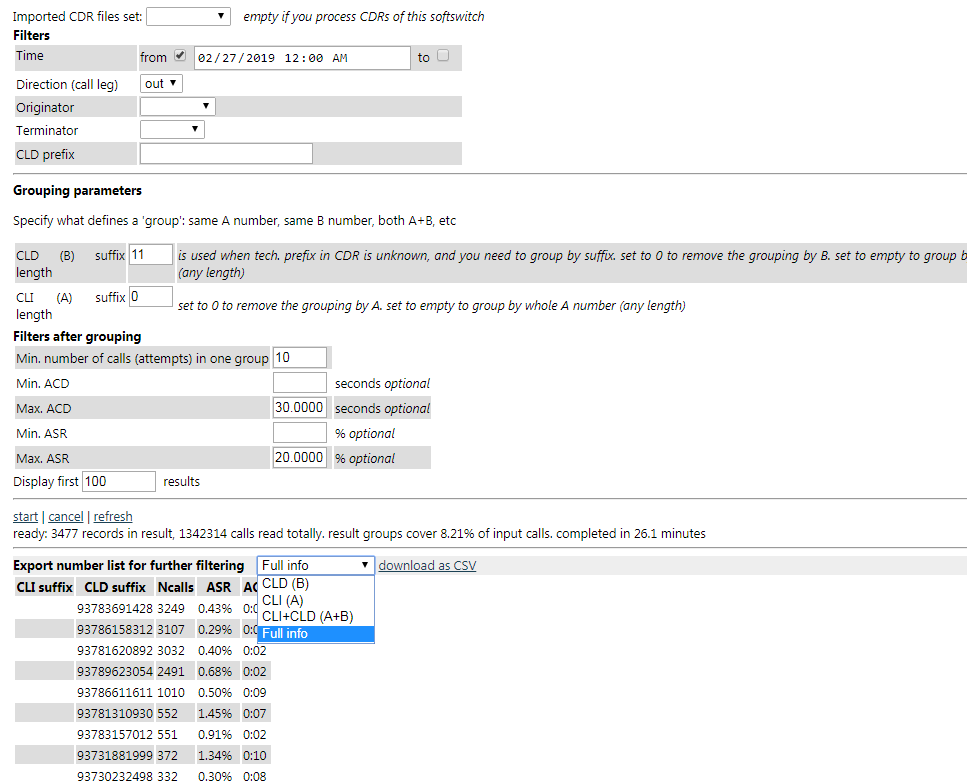
CDR analyser
The webpage is used to analyse numbers in CDR and build blacklists/whitelists to filter VoIP traffic and reduce SIM blocking. For example you can analyse CDR for previous 2 years and build list of B numbers that have been dialed with no answer, or very low ASR or ACD. Such B numbers can be used in originator or terminator settings as blacklist, to avoid spam calls. Another example: you can analyse your previous CDRs to select pairs of A and B numbers with high ASR and high ACD, it would mean combinations of valid caller and called parties. The combinations can be used as whitelist for originator or terminator to filter traffic and pass to NCLI route. The softswitch is able to process both its own CDRs or imported CDRs from another sofswitch (see "Imported CDRs"). Data flow: CDR ---> group by something (A, B numbers) ---> get ASR and ACD for group ---> filter by ASR, ACD, Ncalls in group ---> for the groups build black lists/white lists/grey lists ---> filters for old SIMs, for new SIMsExample: Find out numbers that called more than 10 times and connected 0, 1 or 2 times (ASR less than 20%) with low ACD (less than 30 seconds). B number in CDR contains tech. prefix, last 11 digits are used.
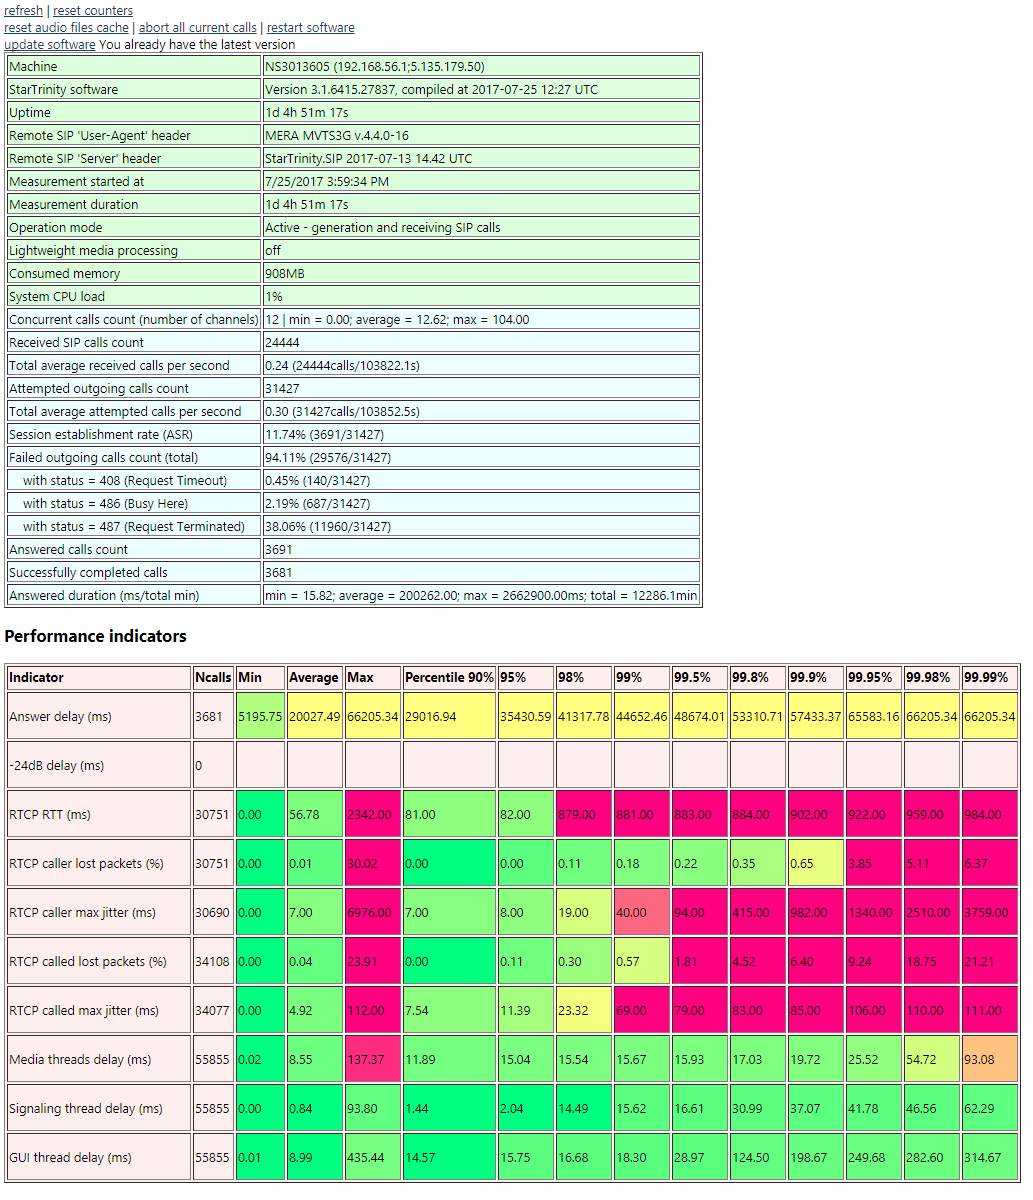
System status and maintenance
On this page you can check status of CPU, memory, monitor system overloads (large delays in threads), restart the softswitch, update software to latest version
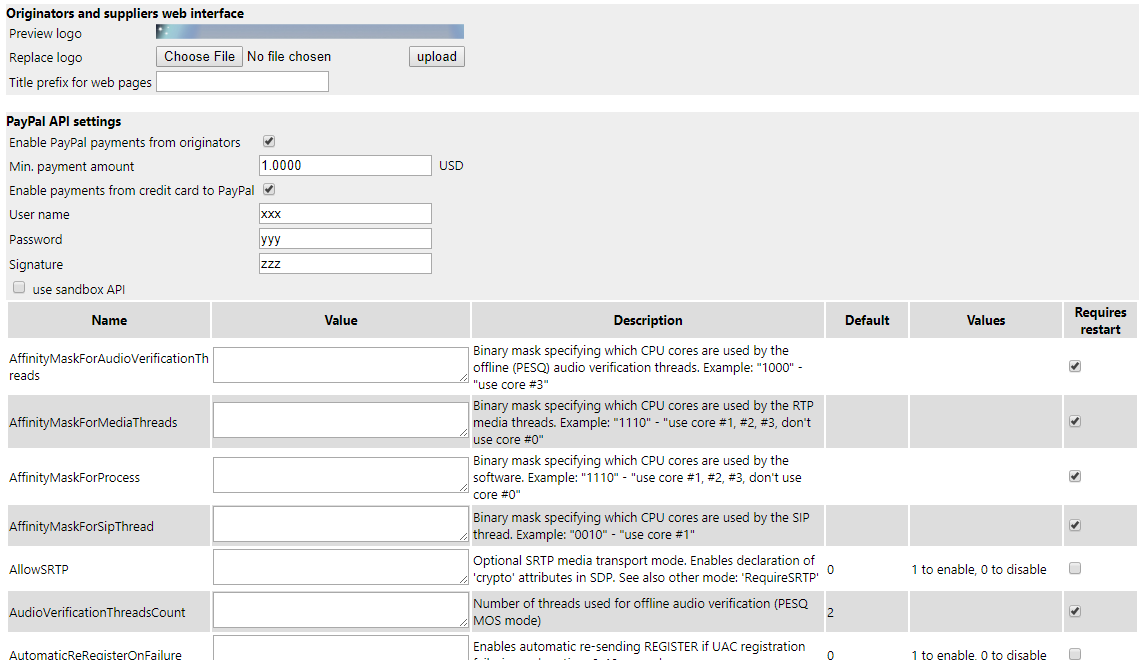
Settings
The page contains general softswitch settings with descriptions; originators and suppliers self-care web portal settings; PayPal API settings for automated settings from VoIP retail usersDefault call processing steps
Call flow in the StarTrinity VoIP softswitch is flexible. Here are default call processing steps:
- Receive call
- Authenticate call: identify originator based on IP address, prefix, CLI, PIN code, etc
- Optionally play IVR menu for calling card user - ask PIN code, destination number
- Determine root customer or root parent for the current originator
- Apply trunk capacity rules of the originator (e.g. max. concurrent calls)
- Extract dialed number (CLD) and caller ID (CLI) from INVITE packet. Apply number translation rules of originator
- Determine tariff: take it from the root customer's service plan
- Determine rate for the call to charge the originator: find it by the longest matching prefix with called number
- Authorize call according to billing rules (e.g. positive balance for prepaid, or debt less than max allowed credit)
- Determine routing group for the call. Take it from settings of the root customer
- Select all destination sets in the routing group which have at least one route matching CLD. From the selected destination sets select route with the longest matching prefix and associated terminator. Example: for CLD = 1234567890 and two destination sets having routes with prefixes 1, 12 and 123, 1234 respectively, the software will select routes with prefixes 12 and 1234. Note: unlike with rates, where only one best matching rate has to be selected, the software selects several routes for the same destination number, but linked to the different terminators.
- Now we the system has a list of terminators for dialing. Apply additional billing rules (e.g. positive margin), implement routing policy of the routing group
- Apply terminator trunk capacity rules (e.g. max. concurrent calls, min. interval between calls)
- Proxy the call to the terminators, try them one-by-one. Apply number translation rules of the terminators
- Abort the call if billed duration goes over originator's threshold
- Apply billing rules: decrease balance of originator based on billed duration and rate
- Measure audio quality of the call, save results to CDR, calculate statistics, send alerts/reports (if configured)
Web API methods
The software has a HTTP-based application programming interface (API). Main methods are described here:- GET /API/MainViewModel/Originators/CreateOriginator?originatorId=xxx& parentOriginatorId=xxx&maxChannelsCount=xxx&webUiUserId=xxx&webUiPassword=xxx&authUser=xxx&authPassword=xxx& balance=xxx&maxCredit=xxx&customCallerId=xxx&email=xxx&address=xxx&customerName=xxx - creates originator, is used for new user sign up at VoIP originator's website
- GET /API/MainViewModel/Originators/GetBalance?originatorId=xxx - returns originator's balance
- GET /API/MainViewModel/Originators/AddBalance?originatorId=xxx&value=10 - add some value to originator's balance
- GET /API/MainViewModel/CreateCall?url=http%3A%2F%2Fyour_server%2Fget_script.aspx&user=usr&password=pass - downloads CallXML script from your web server with specified auth. user and password, creates an outgoing call with the downloaded script
- POST /API/MainViewModel/CreateCall_Post - creates an outgoing call with the uploaded script. Returns Call-ID SIP header of the created SIP call in JSON format: {'status': 'OK', 'sipCallId': 'the_new_call_id'}. CURL example: curl http://X.X.X.X:19019/API/MainViewModel/CreateCall_Post -uadmin:admin --digest -X POST -d "@my_file.xml" -H "Content-Type:text/plain;charset=UTF-8"
- GET /API/MainViewModel/CreateSingleCallCommand - creates an outgoing call using currently pre-configured script
- GET /API/MainViewModel/CurrentCallExists?callerId=XXX&calledId=YYY - checks existence of current call, returns 'true' or 'false'
- GET /API/MainViewModel/DestroyCall?[sipCallId=XXX][&calledId=YYYY][&calledIdSuffix=ZZZZ] - destroys current SIP call(s) with specified parameters:
- sipCallId - SIP Call-ID header of the destroyed call(s)
- calledId - CLD (B number) of the destroyed call(s)
- calledIdSuffix - CLD (B number) suffix of the destroyed call(s) - this parameter omits tech. prefix
- GET /API/MainViewModel/GetCurrentCallsCount?optionalCallXmlVariable1=XXX&optionalCallXmlVariable2=YYY - returns number of current calls, optionally filtered by CallXML variables
- GET /API/MainViewModel/GetVersion - returns software version information - compilation time (UTC)
- GET /API/MainViewModel/SetCallXmlVariables?callerId=XXX&calledId=YYY&direction=ZZZ&var1=value1&var2=value2 - sets CallXML variables for current SIP call, returns 'true' if call was found or 'false' if call was not found. The direction parameter of URL query is optional, it can be "in" or "out"
- POST /API/MainViewModel/UploadNumberList?id=xyz.txt - uploads new numbers into number list with ID = xyz.txt, one number per line in HTTP POST body. The uploaded numbers can be used with "readnumberlist" CallXML element. Uploaded numbers are stored in .TXT files in program folder
- POST /API/MainViewModel/CallcenterAgents/Upload - uploads call center agents data, one item per line. Line format: u=agentSipPhoneUserId;p=agentSipPhonePassword;g=group1 or n=agentPhoneNumber;g=group1. The uploaded numbers can be used with "getcallcenteragent" CallXML element, see CallXML documentation. Uploaded call center agents are stored in .TXT files in program folder
- GET /API/MainViewModel/CallcenterAgents/Download - downloads call center agents data, one item per line
- GET /API/MainViewModel/CallcenterAgents/IsAgentRegistered?u=userId - returns "true" if agent with "userId" is registered; if not registered - returns "false"
- GET /API/MainViewModel/Pricelists/Tariffs/[tariff_id]/RatesXML - returns tariff rates in XML format
- GET /API/MainViewModel/Pricelists/DestinationSets/[destination_set_id]/RatesXML - returns destination set rates in XML format
There are more undocumented methods available, you can see them in Fiddler when using the web interface. Please let us know if you need some new API method
Video tutorials/presentations
We have recorded demo presentations and tech. support sessions:180327 - retail VoIP origination, PIN code IVR, SIP phones setup
180327 - routing, billing, load balancing setup. tracing call via CDR, recording audio for troubleshooting
180328 - tech. prefixes (CLD number manipulation), calls between originator SIP phones
180331 - register Yealink SIP softphone as originator
180511 - configure StarTrinity softswitch with skyline GSM gateway with IVR filter against SIM blocking
180825 - About VoIP Software Quality Assurance (QA), StarTrinity Softswitch, SIP Tester. SIP load testing (stress testing), audio quality tests. How we develop VoIP software and test it. How we test audio quality. What we don't like in marketing. What we don't like in Linux and C++
190105 - Promotion of CDR analyser module to reduce SIM blocking/barring
190108 - StarTrinity Softswitch for GSM termination, FAS, generated traffic
1 general routing : originators, service plans, tariffs, routing groups, destination sets, terminators
1.0 billing is optional if you dont need - need only originators, routing groups, terminators
1.1 custom callxml scripts in originators - IVR, FAS, looped traffic receiver
generated traffic:
wholesaler A (s3 switch) d.c ---> wh. B ---> wh. C, D, E --return traffic--> (originator) loop back to wholesaler A
1.2 FAS, callxml scripts
2 filter options in originator, terminator - dynamic blacklists, static whitelists, blacklists
3 CDR to number lists
select ASR, ACD from CDR_set GROUP BY A, B WHERE ACD < xx
3.1 imported CDRs
190109 - StarTrinity Softswitch for GSM termination, FAS, generated traffic. part 2
4. ways of blocking SIMs by test calls - test call campaigns, CLI tests and lists of B numbers
5. status, current calls, CDR page, call log to see why call was rejected. see SIP trace. recording
6. system status, errors
7. employees
8. notifications
9. gateways - for GoIP
10. tenants
11. CDR statistics
5. status, current calls, CDR page, call log to see why call was rejected. see SIP trace. recording
6. system status, errors
7. employees
8. notifications
9. gateways - for GoIP
10. tenants
11. CDR statistics
190111 - StarTrinity Softswitch for Dialer Campaigns, custom CallXML. part 3
1) dial 111@ ip address, SIP port - element "call"
2) wait for connection
3) read number1, number2 from csv. read CSV one time only - "readcsv"
123456,456789
2879872,87987654#
654654,64654654
4) wait 2 sec
5) dial number1 (send DTMF) press digits
global setting DtmfSendingIntervalMs (def. 200ms)
6) wait 5 sec (while dialing)
7) dial number2 (send DTMF) press digits
8) wait 3 sec (while dialing)
9) play music/ivr/wav file (max time = 5 min)
<callxml type="custom">
<readcsv value="c:\csv\numbers.txt" var0="number1" var1="number2" repeat="1" />
<log value="read from csv: number1=$number1; number2=$number2;" />
<call callerId="121212121" value="sip:echo123@startrinity.com:6060" maxringtime="30s" testId="DC1" debugMediaRx="true">
<on event="answer">
<wait value="2s" />
<playdtmf value="$number1;" />
<wait value="5s" />
<playdtmf value="$number2;" />
<playaudio repeat="infinite" maxtime="5m" value="music.wav" />
<exit />
</on>
</call>
</callxml>
GSM Termination - GoIP SIM management in StarTrinity softswitch